Spooooooooky Hooouuusessss

More than one grade level will be getting in on this Halloween Fun! What might just look like some sort of decoration... there are some great concepts behind this one.

Architecture and Structures: What does balance mean?
Value: What is a silhouette?  Where is the light source?


Shape: Geometric Vs. Organic... which one makes better building blocks?
Color: How do the cool colors create a spooky atmosphere?


Learning + Creativity = FUN!

3rd Grade is COLOR CRAZY!

A Huge emphasis is on color theory click here to see COLOR EXPERIMENTS day 1 .  These color experiments led us to some great INVESTIGATION.  We borrowed some magnifying glasses to look closely at our color mixes.

Investigating led to DISCOVERY...

Discovery led to DESCRIPTIVE & CREATIVE LABELING...


"Value"able Flags Update

After several weeks of careful work our flags are complete!  To top is off we all learned a ton about value, what it is, why artists use it in their artwork, and how to create it in our own!  Click on the 5th grade tab to see more about this project.

How it all began...

Here are some more pics of the process and the end results...


1st Grade Fantastic Self-Portraits

Look at the Fantastic FIRST GRADERS!!!

These self-portraits have sooooo much character!  We learned basic facial proportions, like how big our facial feature are and where they should be.  We also talked and investigated the shapes and line that help us draw all of our unique faces.  The book My Many Colored Days was shared and we thought about colors and what they mean to us.  How color sometimes can show moods and emotions. This helped with the background.

Sometimes it can be tricky to find the right colors for our skin and hair, so we talked about how to layer colors and shared the book The Colors of Us to help us think about what kinds of colors we might need.  The book helped us visualize colors by giving us some juicy descriptions of colors... like cinnamon and honey.... it kind of made us hungry!


3rd Grade Color Experiments

Third grade is a big year for color theory.  Every year it is a new adventure and this year I think we figured out a perfect way to experiment with color interactions or color mixing.  After really looks at and understanding what the color is and how it works - it was time to explore.  We used regular crayola markers on plain white paper.  We colored and filled our paper with all of our marks.  We thought about what colors we wanted to put next to each other and started to predict what would happen it they mixed.

Then, the magic begins... plain ol' clear and clean water and a paint brush is all you need for this trick.  When the marker is wet it turns into what looks like watercolor paint!  It moves and mixes, runs, and drips.  SO NEAT and needless to say AMAZING!

When our experiments were over we discussed what happened.  Did anything happen that we predicted, or did something happen that was unexpected.  Artists became scientists for a day in the art room.


"Value"able Flags

5th Grade has begun working on the project we will send to Square1art for our art fundraiser.  The Ooohhhhs and Aaaaahhhhhs this project got when I showed them the finished example warmed my heart and energized the art room.

WOW and AMAZINGNESS.... hmmm but how will we achieve it?  Through VALUE!  Value shows the differences between lights and darks in a piece of artwork.  When we use value we can create DEPTH and what appears to be an optical illusion.  All very nifty tricks!  In 4th grade last year we learned about value and optical illusions, and this project builds on those skills and takes them to a new level.

To start we created a value scale by using shading.  We needed to get our muscle memory back on what it feels like to shade using layers or variable pressure. Our paper was divided in to columns with a couple diagonal lines.  Each column then had rows, that either curve up or curve down.  After that it becomes a shading game.  Creating value scales within each space... kind of crazy how everyone became super-hyper-focused and all you could hear was a pencil scratching on the paper.  Fun stuff!

What started out as something that may be a huge unattainable concept, or visual effect, became within grasp.  Instead of hearing oooohhhs and aaaaahhhhs about the amazingness that we will acheive, I was hearing thoughtful remarks... "Now I get it" or "Wow this makes sense, do you see it?".  Students started explaining to one another who the illusion was going to work.  It started to "Click" inside of their brains - that is the true AWESOME that we all strive for.

Can't wait to post more on this one soon! 


"Free Create"

There is never a dull moment and there is always something to do in the art room!

No matter how hard I try to predict and schedule when my students will finish a project... there is always some sort of extra time that some students will have.  Sometimes there is an extension project using the same concepts and materials as our main unit of study.  If there is no extension mostly everyone enjoys 'free draw' meaning they can use the drawing books from the bookshelf, are encouraged to use their own imaginations.

Working hard on the 'sheet of the week'
This year I have added a few things to our 'free' time.  There is a coloring 'sheet of the week' that I have already finished and put on display.  The 'sheet' can go home, always a bonus!.  There is also an 'idea of the week', which is a drawing prompt that can be completed and turned in for me to hang in the art room.

We have a few puzzles and games too.  The puzzles are problem-solving based, like tangrams.  Games require logic skills.  Soon we will have a building area too, where we can use straws and connecter to create structures.


Students are also welcome to read any book from the bookshelf and find a comfortable spot in the room to enjoy the book.

1. Playing Square Up
2. Coloring the 'sheet of the week'
3. Reading a book


I Ain't Gunna Paint no More! Day Two...


Day Two - The Challenge!
Where to start!?! The basic directions are to... find hidden pictures, hidden shapes, and special places and then bring them make them BOLD to stand out and catch our eye.
How to do that? Hmmm VERY VERY close looking, concentration, and stretching those imaginations.  We used oil pastels to start tracing shapes and lines in our artwork.  Shapes could be made with different colors positive shapes or where there was no color negative shapes.

 After we traced these shapes and lines... then we started to add other patterns of shapes and lines on top or around our paintings.


These pieces are beautiful and unique! From a distance they are bold and colorful.  When you take a minute to investigate them closely you will see amazing details our artists added.  From first graders to fifth graders we are building those creative thinking skills.
LINES, LINES, everywhere there are LINES!

Kindergarten is learning all about the powerful drawing tool called LINE! Lines help us draw anything we can imagine.  Lines can make shapes, lines show us directions, lines can even help us write numbers and letters!

We practiced our straight lines and dashed lines.  We rolled up and down with wavy lines.  The Zig-Zag line crashed on our papers, while the swirly line went around and around.  We also tried out the loopy line.  Sometimes loops go up, sometimes loops go down.

I think our kindergartners have mastered the powerful LINE.

The Smell of Paint!

The start of a new school year.  Taking chances, learning new things, and believe it or not-PAINTING THE FIRST DAY!!! Craziness and soooo much FUN!  This year I thought I would shake things up a bit and jump right into paint with all first thru fifth grade classes at KBK.  Some thought it couldn't be done... I was even called brave to take the chance... but I was willing to bet that our kids could do it.  All 1st-5th grade listened to my retelling of the great book I Ain't Gunna Paint No More. After a short review of how to treat our brushes it was off the races.


See our awesome drying rack filling up with really neat paintings.  

Where o' Where has the time gone!

No excuses here, only happiness to share!  There will be several posts coming today with pictures and all to get caught up.  Many of the projects we have been working on the past month have flown by so quickly without taking picture!  The happiness is that we are totally caught up in the art making, that taking the pics became an after thought.  So, what have we been doing...?

Kindergarten has been working non-stop on some great cool color tissue paper collages and are getting to add a snowman on top.

First grade drew some amazing snow people all bundled up in snow gear... fits the weather we have had recently!

Second grade created some beautiful symmetrical snowflakes on warm tissue paper collages.

Third grade is knee deep in color theory.

Fourth grade experimented with the challenges of drawing the longest, most interesting, line.

Fifth grade has been super focused on the amazing human eye and drawing realistically.

So that's the written update in a nutshell- pictures and details to follow!

Kindergarten Clay!

Texture Shoe-prints create amazing pendants or ornaments.  Kinders had their first chance to roll and squish clay for this project.  We talked about textures, how does it feel on our fingers... lumpy, bumpy, soft, smooth, furry, fuzzy, scratchy, rough.  Everyone investigated the textures on the bottom their shoes.  The texture from the shoes was pressed into the clay ball leaving a shoe-print.

The shoe-prints were 'fired' in the kiln.  The kiln is a neat machine that gets really hot to make the clay really hard like a rock.

Then, we set up a glazing station.

Glaze is like a special kind of paint for clay.  The glazed clay shoe-prints were loaded back into the kiln to 'fire' once again and to melt the glaze so it turns into glass.

With a little help, bits of yarn was glued to the back so they will be easy to hang.

Today everyone created an Origami pocket to safely take the ornament and poem home.  Origami is the art of folding paper, no cutting, gluing, or taping needed to make something special.

Tints and Shade of Snowmen

3rd Grade is learning about TINTS and SHADES.  We have learned a lot about how to mix colors, and now we are practicing making tints and shades.
Tint has a kind of a rhyme... all you need to remember is to make a Tint, add White, and it makes it light.  Tint-White-Light.
Shade is a different story, no rhymes, but some letters in common.  To made a Shade, add Black, and it makes it Dark.
A work in progress, Day One- TINTs
The art room was a buzz on day one.  Wow, look at this color!!! I made a tint!  Does this tint look darker?  Day One we mixed 3 tints-a light, medium, and dark.

Day Two - Shades took over.  We mixed a shade of our original color to paint the snowman's accessories.  Once again, a buzz of excitement.  Everyone was very careful to only use a little black at a time.
I was so happy with how these paintings turned out that I hung them up immediately in the display case.  Fortunately, 1st grade also finished their pinch pot snowmen today, and the 3rd grade painting make a beautiful backdrop.


Sleepytime Quilts

1st grade can weave too!  Everyone learned the importance of a tabby weave, with the under over pattern.

Our blankets show a fuzzy and snuggly texture.  Did you notice a color scheme?  We used warm and cool colors.  Weaving was kind of tricky, but a with a little practice and a little patience, everyone wove their blanket.  A ribbon was glued across the top to finish them.  

The weavings make a great display in the hallway with all of the peaceful dreaming faces snug under the blankets.


5th Grade Pocket Weaving

The much anticipated pockets!  When I went through this project for the first time myself, I didn't really believe that it would turn out as great as what it did.  You can imagine the excitement for fifth grade when they get to actually weave a unique and personal pocket or pouch that includes a flap and button to close it.  This is not a quick project but instead one where hard work totally pays off.

How it comes together...
Day 1: All about measuring and cutting.  Everyone creates their own loom to weave on.  On day one we create the loom and then wrap it with white string.  The sting will keep the whole thing together when we take it off of the loom.
Days 2-4: Weaving, Weaving and yet more Weaving.  It is super important to know the ABAB pattern to weave a strong pocket, and to keep the yarn scrunched and tight.  Loose yarn or the wrong will make for a weak pocket that may have holes in it.
Days 4-5: The magic!  We get to take the weaving off of the loom and see it transform into a nifty pocket!  This is the day that creates a lot of nervous energy.  It is the time to see if the pocket will be strong or weak.  Once the pocket is off of the loom-more excitement-digging through and picking out the perfect button.
Weavings on the loom.

Working on the 'flap' of the pocket. 

Finished pocket!
You should ask your child about this whole project.  It takes a lot of time and thought.  Many of us become better critical thinkers and problem solvers throughout this project.  You would be amazed to see how many questions there are the first day and how few there are by the end.  At the end most of the students can help classmates and can become teacher assistants.  It is great to see!

I'm always amazed with how great these turn out and all of the things we learn along the way.  I also am proud of myself this year for finally organizing yarn in a manageable way for everyone to be able to pull, measure, and cut their own yarn.

Yarn Station
I upcycled some crayon boxes by cutting slits in the front of the box.  The skein of yarn is safely tucked inside with the tail hanging on the outside... genius!


Weaving 2 Ways

Fourth grade has been crazy busy weaving! Basket weaving it where we started.  So many great discussions about what weaving is, why it exists, and how it came to be.  All 4th graders were delighted to find out that they were going to be making a functional piece of art... meaning something they can actually use!  They all cut out a template as we discussed a weaving pattern.  Some of them could recall weaving from second grade, but the vast majority forgot how to problem solve their way through the pattern.  Also, to weave the bowl they were working around a circle, not just back and fourth.
A pile of bowls awaiting to be finished and taken home.
I meant to get a picture of the weavers in progress, but I ended up cutting yarn, helping problem solve knots, and a plethora of other things that popped up.  So after the yarn created strong walls and got about an inch away from the edge, all of the yarn was neatly trimmed and the bowls were finished off with a bit of paint on the tips and the base.

As weavers were finishing up with the bowls, others started creating a paper weaving.  4th grade measured and cut a loom to weave on top of.  Next they picked up a few colored strips of paper.  They wove using an ABAB pattern.  All hands were on deck to staple these weavings into cylindrical tubes.  They will look like lanterns hanging from the Art room ceiling. 
Weavings ready to be be tubes or cylindrical

Totally Tubular!

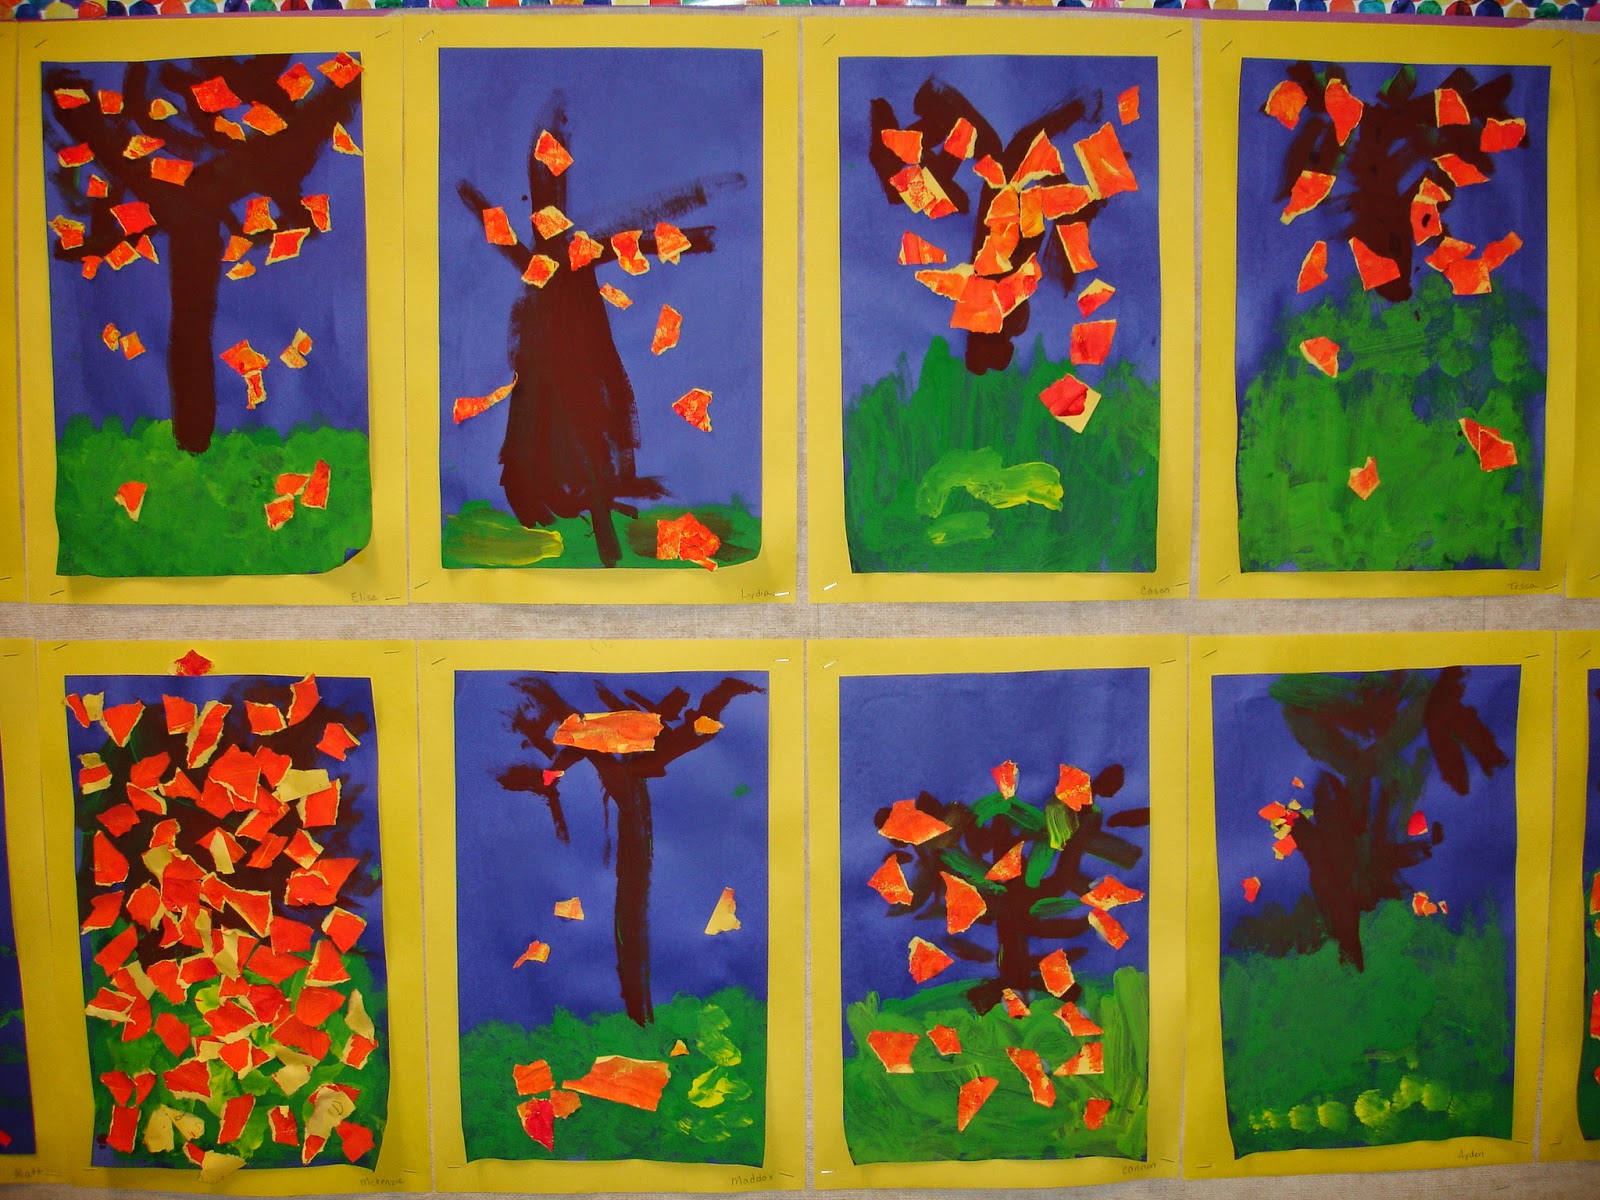
Kindergarten Fall Trees

Fall was in the air when we started these trees a couple of weeks ago.  Unfortunately, crazy winter has already set in and we have below zero wind chills.  Any of our beautiful fall trees are frozen.  These trees offer a wonderful warm pop of color.

This was a 3 day project.
Day one we read the book Red Leaf, Yellow Leaf learned all about those beautiful warm colors-red, orange, and yellow.  We used sponges to paint our paper so our colors could overlap and mix.
Day two we layered our green and yellow paint for grass on the bottom of the paper.  Everyone did their best to create great texture with short little brushstrokes.  Then, we thought and thought...what capital letter would make a good tree? an I? a T? better yet a Y!  We pretended we were a seed beneath the soil and grew very tall and spread our branches.  After acting it out we were ready to paint our tree.
Day three today! We discussed the edges and textures of leaves, and yes, we were able to tear our warm color painting and glue down as many or as few leaves we wanted.